Developing for The Glitch
The Glitch is Arduino compatible hardware. Firmware for The Glitch can be written using the Ardunio IDE. There is some great documentation on development provided on the Arduino website. Code from existing Arduino sketches can also be ported and compiled for The Glitch (see How to Compile).
Firmware can be written to accept user input from the DIP switch and Micro SD card, so it is not necessary to write or edit code. The DIP switch allows dynamic input from the user which can be used in coordination with individual modules on the Micro SD card. These modules consist of a configuration file (plain text or otherwise) interpreted by the firmware to perform a specific task. Modules are configured by the user ahead of time on the Micro SD card to perform specific tasks based on the firmware. Developers are encouraged to use the Code Template for projects.
For example, a Keystroke Injection module would contain a configuration file and a payload. The configuration file tells the firmware that the payload is a Batch script that will run on a Windows computer. The firmware interprets the configuration and performs all the tasks necessary to read in the Batch script from the Micro SD card, type it out on the target system, run and delete the script.
Developers can follow these instructions to set up an environment to program for The Glitch.
User VS Developer
One concept that is different between projects using The Glitch and similar hardware platforms is the difference between a User and Developer. Most open hardware platform projects assume that the User will also be able to write and edits source code. Instead of requiring users to compile and edit code on their own, developers for The Glitch should provide a pre-compiled HEX file (firmware) along with the source code of their projects (see Compile for a guide on accessing your compiled firmware). This is similar to developers providing an application rather then just the source code. This makes it much easier for Users to flash The Glitch with the firmware from your project and hit the ground running (See Loading Firmware).
Install Arduino Environment
Download and install the Ardunio environment from http://arduino.cc/en/Main/Software. This software runs on Windows, Linux, and OXS. We recommend using version 1.0.x of the Ardunio software.
For more information on the Ardunio environment, see http://arduino.cc/en/Guide/HomePage.
Install Libraries
Install the libraries and resources.
Teensyduino
Download the Teensyduino library for Windows, Linux (32), Linux (64), or OS X. This bundle includes hardware resource files and many libraries. Follow the step-by-step menu to install the Teensyduino resources into the Arduino installation directory. It is recommended to install all available libraries in the Teensyduino bundle.
GlitchLib
The Glitchlib library includes some basic variables and functions to make developing for The Glitch easier. Copy and paste the GlitchLib folder from the Resource Files into the libraries folder of the Arduino installation directory. For more information see GlitchLib.
Edits to Resources
With the resources installed, there are still a few manual edits that need to be made.
Add "The Glitch" Board To the Arduino IDE
In the directory where the Arduino software has been installed, open arduino/hardware/teensy/boards.txt in a text editor. Add the following at the end of the file and save the file. This will add The Glitch as an Board in the Arduino IDE the next time it is started.
glitch.name=The Glitch
glitch.upload.protocol=halfkay
glitch.upload.maximum_size=122880
glitch.upload.speed=115200
glitch.upload.disable_flushing=true
glitch.bootloader.path=undefined
glitch.serial.restart_cmd=true
glitch.serial.safe_baud_rates_only=true
glitch.upload.avrdude_wrapper=avrdude
glitch.build.mcu=at90usb1286
glitch.build.core=teensy
glitch.build.elide_constructors=true
glitch.build.cpp0x=true
glitch.build.dependency=true
glitch.build.linker_relaxation=true
glitch.build.serial_number=true
glitch.menu.usb.serial.name=Serial
glitch.menu.usb.serial.build.define0=-DUSB_SERIAL
glitch.menu.usb.hid.name=Keyboard + Mouse
glitch.menu.usb.hid.build.define0=-DUSB_HID
glitch.menu.usb.hid.fake_serial=teensy_gateway
glitch.menu.usb.int_disk.name=Disk(Internal) + Keyboard
glitch.menu.usb.int_disk.build.define0=-DUSB_DISK
glitch.menu.usb.int_disk.fake_serial=teensy_gateway
glitch.menu.usb.int_disk.build.elfpatch=mktinyfat
glitch.menu.usb.sd_disk.name=Disk(SD Card) + Keyboard
glitch.menu.usb.sd_disk.build.define0=-DUSB_DISK_SDFLASH
glitch.menu.usb.sd_disk.fake_serial=teensy_gateway
glitch.menu.usb.midi.name=MIDI
glitch.menu.usb.midi.build.define0=-DUSB_MIDI
glitch.menu.usb.midi.fake_serial=teensy_gateway
glitch.menu.speed.16.name=16 MHz
glitch.menu.speed.16.build.f_cpu=16000000L
glitch.menu.speed.8.name=8 MHz
glitch.menu.speed.8.build.f_cpu=8000000L
glitch.menu.speed.4.name=4 MHz
glitch.menu.speed.4.build.f_cpu=4000000L
glitch.menu.speed.2.name=2 MHz
glitch.menu.speed.2.build.f_cpu=2000000L
glitch.menu.speed.1.name=1 MHz
glitch.menu.speed.1.build.f_cpu=1000000L
glitch.menu.keys.en-us.name=US English
glitch.menu.keys.en-us.build.define1=-DLAYOUT_US_ENGLISH
glitch.menu.keys.fr-ca.name=Canadian French
glitch.menu.keys.fr-ca.build.define1=-DLAYOUT_CANADIAN_FRENCH
glitch.menu.keys.da-da.name=Danish
glitch.menu.keys.da-da.build.define1=-DLAYOUT_DANISH
glitch.menu.keys.fi-fi.name=Finnish
glitch.menu.keys.fi-fi.build.define1=-DLAYOUT_FINNISH
glitch.menu.keys.fr-fr.name=French
glitch.menu.keys.fr-fr.build.define1=-DLAYOUT_FRENCH
glitch.menu.keys.fr-be.name=French Belgian
glitch.menu.keys.fr-be.build.define1=-DLAYOUT_FRENCH_BELGIAN
glitch.menu.keys.fr-ch.name=French Swiss
glitch.menu.keys.fr-ch.build.define1=-DLAYOUT_FRENCH_SWISS
glitch.menu.keys.de-de.name=German
glitch.menu.keys.de-de.build.define1=-DLAYOUT_GERMAN
glitch.menu.keys.de-ch.name=German Swiss
glitch.menu.keys.de-ch.build.define1=-DLAYOUT_GERMAN_SWISS
glitch.menu.keys.is-is.name=Icelandic
glitch.menu.keys.is-is.build.define1=-DLAYOUT_ICELANDIC
glitch.menu.keys.en-ie.name=Irish
glitch.menu.keys.en-ie.build.define1=-DLAYOUT_IRISH
glitch.menu.keys.it-it.name=Italian
glitch.menu.keys.it-it.build.define1=-DLAYOUT_ITALIAN
glitch.menu.keys.no-no.name=Norwegian
glitch.menu.keys.no-no.build.define1=-DLAYOUT_NORWEGIAN
glitch.menu.keys.pt-pt.name=Portuguese
glitch.menu.keys.pt-pt.build.define1=-DLAYOUT_PORTUGUESE
glitch.menu.keys.pt-br.name=Portuguese Brazilian
glitch.menu.keys.pt-br.build.define1=-DLAYOUT_PORTUGUESE_BRAZILIAN
glitch.menu.keys.es-es.name=Spanish
glitch.menu.keys.es-es.build.define1=-DLAYOUT_SPANISH
glitch.menu.keys.es-mx.name=Spanish Latin America
glitch.menu.keys.es-mx.build.define1=-DLAYOUT_SPANISH_LATIN_AMERICA
glitch.menu.keys.sv-se.name=Swedish
glitch.menu.keys.sv-se.build.define1=-DLAYOUT_SWEDISH
glitch.menu.keys.en-gb.name=United Kingdom
glitch.menu.keys.en-gb.build.define1=-DLAYOUT_UNITED_KINGDOM
glitch.menu.keys.usint.name=US International
glitch.menu.keys.usint.build.define1=-DLAYOUT_US_INTERNATIONAL
How to Compile
Setting environment
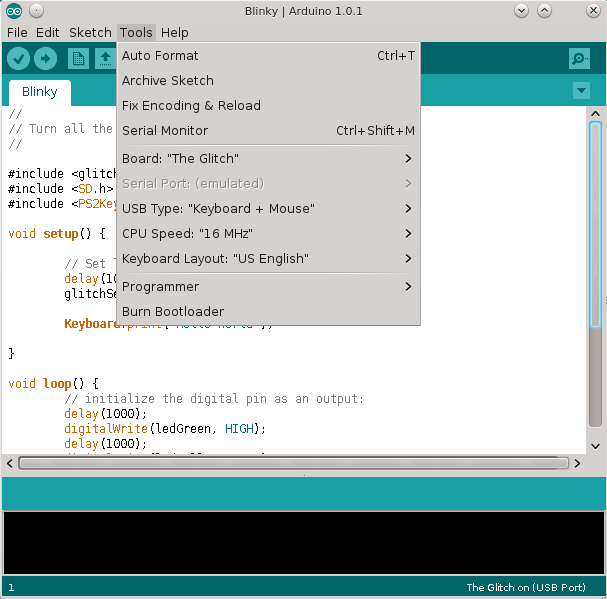
Under the Tools menu, users can select the parameters for compiling.
Select Glitch, Tools -> Board -> “The Glitch”
Select USB Type, Tools -> USB Type -> “Keyboard + Mouse”
Select CPU Speed, Tools -> CPU Speed -> “16MHz”
Set to Verbose
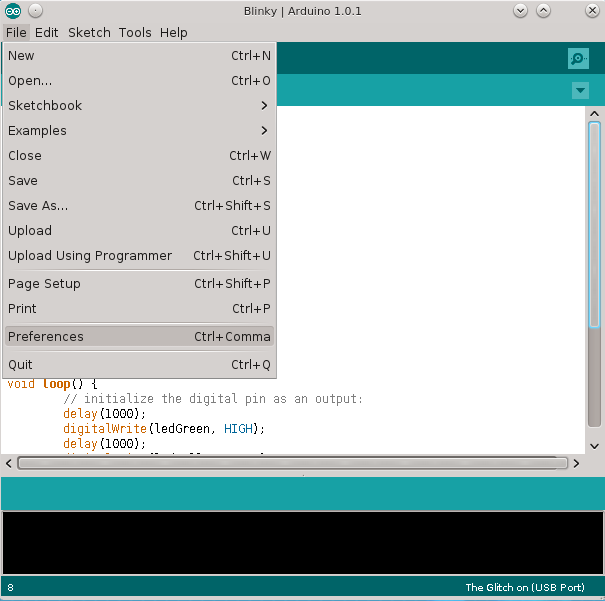
Change the Arduino environment to display verbose output. Select File -> Preferences
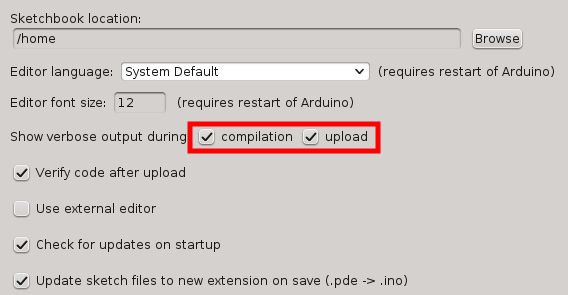
In “Show verbose output during”, Check the box for “compilation” and “upload”.
Compile
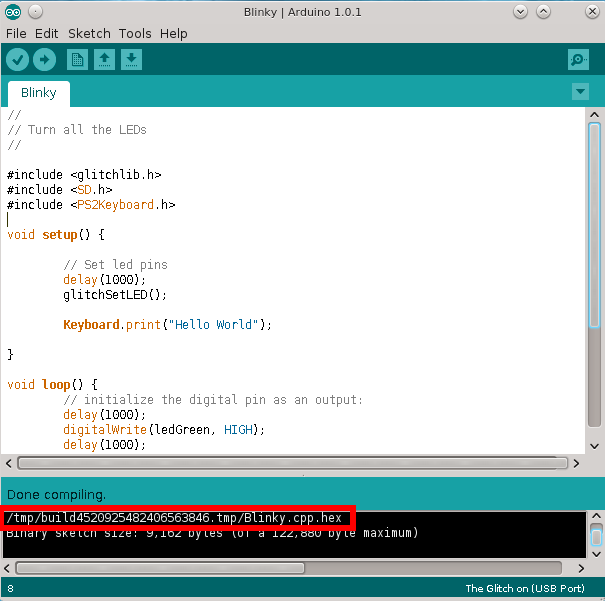
The Glitch does not use the AVR serial uploader that is used by most Arduinos. Instead, HEX files are uploaded from the command line. Unfortuantly, the Ardunio IDE does not place the compiled sketch file in the same directory as the source code. Instead, the file is place in a semi-random directory. Look at the verbose output from the Ardunio IDE for the location of the compiled HEX file.
While the Arduino environment is running, the HEX file will be replaced every time the code is compiled. When the environment is closed and open again, the directory path may change.
Linux:
/tmp/build[RANDOM NUNBER].tmp/[FILENAME].cpp.hex
OSX:
/tmp/build[RANDOM NUNBER].tmp/[FILENAME].cpp.hex
Windows:
C:\temp\[FILENAME].cpp.hex
Copy Executable
(Optional) Copy the .HEX file to the directory of the source code.
Upload HEX
Firmware can be uploaded to The Glitch using the glitch_loader command line utility. Follow the instruction in Loading Firmware to upload firmware.
Publishing Projects
Projects published for The Glitch should include:
- Source Code - Source code project files and custom libraries. Including the .ino or .pde file.
- Firmware - The compiled .hex firmware binary.
- Documentation - Documentation online or in a README file.
- Module Directories - Follow the guide to provide module folders for each module on the Micro SD card.
Code Template
The following code is the suggested template for Glitch projects. It provides the functionality to utilize the DIP switch and read configuration files from the Micro SD card.
Create a new Arduino project, then copy and paste the following code. Customize the code in the specified CHANGE BLOCKs.
Template
#include <glitchlib.h>
#include <SD.h>
unsigned long waitTime = 1000;
short nextInt = -1;
char file_sd_path[66] = {0};
char config_file[13] = "config.txt\0";
char wait[10] = {'\0'};
char frimwarename[16] = "name\0";
char frimwareversion[16] = "1.0\0";
char file_sd_root[9] = "example\0";
void setup() {
delay(100);
short selection = 0;
glitchSetLED();
glitchSetDIP(selection);
if (!glitchSetSD()) {
printError("MicroSD read fail.");
return;
}
SelectPayload(selection);
}
void runPayload(int selection) {
delay(waitTime);
}
void readConfig(int selection) {
setSDModPath(selection, "mod.cfg");
File confFile = SD.open(file_sd_path,FILE_READ);
unsigned int sizeConfFile = confFile.size();
unsigned int positionConfFile = 0;
if (confFile) {
while (positionConfFile < sizeConfFile) {
delay(50);
int i = 0;
char line[262]={0};
char c;
do
{
c = confFile.read();
line[i]=c;
i++;
positionConfFile++;
} while (c >= 0 && c != '\n' && c != '\r' && positionConfFile < sizeConfFile);
if (c == '\n' || c == '\r') {
line[i]=c;
}
if (line[i] == '\n' || line[i] == '\r') {
i--;
}
if ((i > 5) && (line[0] != '#' ) && (line[0] != '\n')){
int k = 0;
char option[5]={'\0'};
while (line[k] != ':' ){
option[k]=line[k];
k++;
}
k++;
unsigned short varLength=k;
if (strcmp(option, "wait") == 0) {
while (k < i) {
wait[k-varLength]=line[k++];
}
waitTime = strToInt(wait);
} else {
printError("'config.txt' format.");
}
}
}
} else {
printError("no file 'config.txt'.");
}
confFile.close();
}
void SelectPayload(short selection) {
switch (selection) {
case 0:
delay(500);
break;
case 1:
writeHelp();
break;
case 2:
readConfig(selection);
runPayload(selection);
break;
case 3:
readConfig(selection);
runPayload(selection);
break;
case 4:
readConfig(selection);
runPayload(selection);
break;
case 5:
readConfig(selection);
runPayload(selection);
break;
case 6:
readConfig(selection);
runPayload(selection);
break;
case 7:
readConfig(selection);
runPayload(selection);
break;
case 8:
readConfig(selection);
runPayload(selection);
break;
case 9:
readConfig(selection);
runPayload(selection);
break;
case 10:
readConfig(selection);
runPayload(selection);
break;
case 11:
readConfig(selection);
runPayload(selection);
break;
case 12:
readConfig(selection);
runPayload(selection);
break;
case 13:
readConfig(selection);
runPayload(selection);
break;
case 14:
readConfig(selection);
runPayload(selection);
break;
case 15:
readConfig(selection);
runPayload(selection);
break;
case 16:
readConfig(selection);
runPayload(selection);
break;
case 17:
readConfig(selection);
runPayload(selection);
break;
case 18:
readConfig(selection);
runPayload(selection);
break;
case 19:
readConfig(selection);
runPayload(selection);
break;
case 20:
readConfig(selection);
runPayload(selection);
break;
case 21:
readConfig(selection);
runPayload(selection);
break;
case 22:
readConfig(selection);
runPayload(selection);
break;
case 23:
readConfig(selection);
runPayload(selection);
break;
case 24:
readConfig(selection);
runPayload(selection);
break;
case 25:
readConfig(selection);
runPayload(selection);
break;
case 26:
readConfig(selection);
runPayload(selection);
break;
case 27:
readConfig(selection);
runPayload(selection);
break;
case 28:
readConfig(selection);
runPayload(selection);
break;
case 29:
readConfig(selection);
runPayload(selection);
break;
case 30:
readConfig(selection);
runPayload(selection);
break;
case 31:
readConfig(selection);
runPayload(selection);
break;
}
}
void setSDModPath(int num, char * file){
if (num < 10) {
sprintf(file_sd_path,"%s/mod0%i/%s", file_sd_root, num, file);
} else {
sprintf(file_sd_path,"%s/mod%i/%s", file_sd_root, num, file);
}
}
int strToInt(char * string){
unsigned short strLength = strlen(string);
long int strInt = 0;
unsigned short i=0;
for (i; i < strLength-1; i++) {
strInt = strInt + (((int)string[i]-48)*(pow(10,(strLength-1-i))));
}
if (i == strLength-1) {
strInt = strInt + (((int)string[i]-48));
i++;
}
if (strInt > 0){strInt++;}
return strInt;
}
extern void writeHelp(){
delay(3000);
Keyboard.print("\n\n ");
Keyboard.print(frimwarename);
Keyboard.print(" ");
Keyboard.print(frimwareversion);
Keyboard.print(" Modules\n\n");
for(unsigned short i = 0; i < 32; i++){
setSDModPath(i, "help.txt");
File dataFile = SD.open(file_sd_path,FILE_READ);
Keyboard.print("\n\n Module ");
Keyboard.print(i);
Keyboard.print(":\n\n");
if (dataFile) {
delay(1000);
while (dataFile.available()) {
delay(5);
Keyboard.print((char)dataFile.read());
}
} else {
printError("No help.txt file\n");
}
dataFile.close();
}
}
void printError(char * message){
Keyboard.print("Error: ");
Keyboard.print(message);
digitalWrite(ledRed, HIGH);
}
void loop(){}


 1.8.1
1.8.1